Friday, August 29, 2014

Fun Fold Friday - Quarter Fold

 
Fun Fold Friday again! 
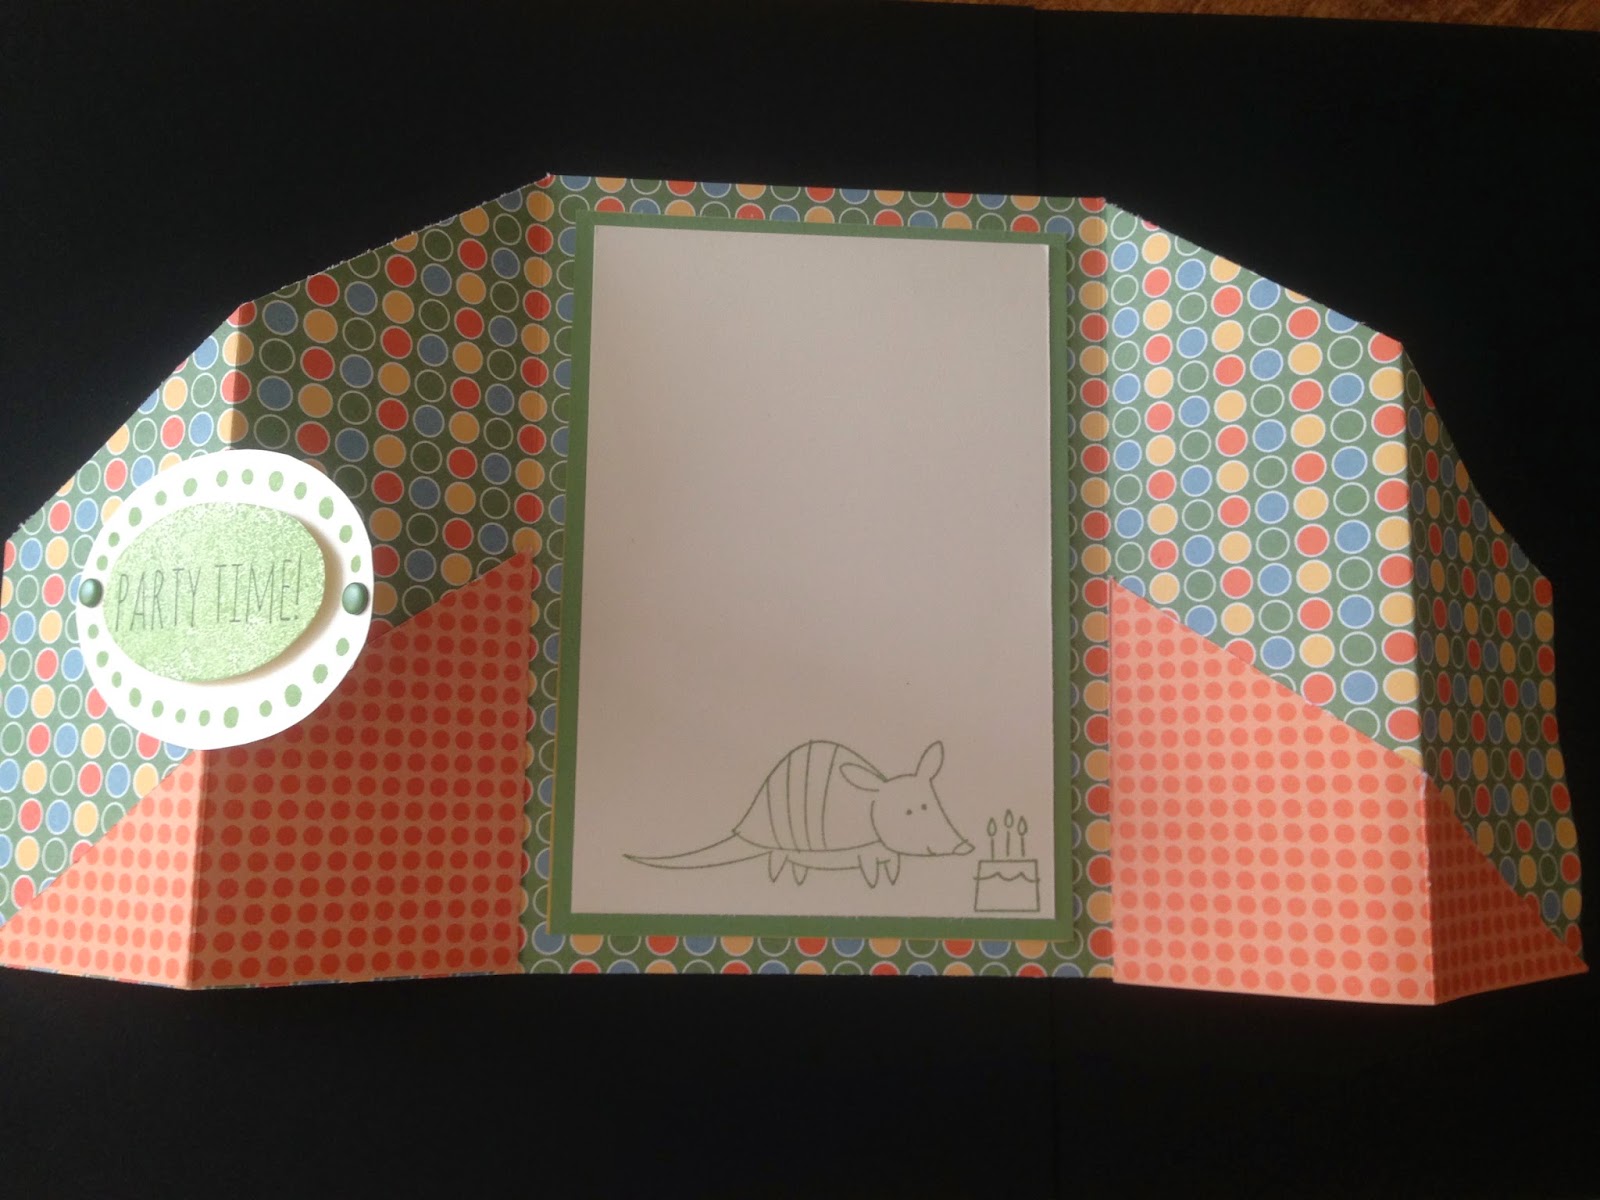
This card is called a Quarter Fold card and it is really very easy to make! And really has such a different look. You will need two pieces of card stock (or if you prefer one piece of card stock and one piece of DSP which would look very cool too!) I used Pumpkin Pie and Delightful Daffodil.
  • Pumpkin Pie (or what ever you chose to be your back colour) 4 1/4 X 11
  • score on long edge at 2 3/4 X 8 1/4
  • Delightful Daffodil 5 1/2 X 8
  • score on long edge 2 1/8 X 6 3/8
  • line up pieces between the score lines (use your Tom Bow glue so that you can get them lined up properly)
  • use to bone folder to crease the score lines both way (this makes folding it in easier)
  • then fold in the left side, bottom, right side and then the top just like you would the top of a box
  • if you wish to add paper to the front of your card cut two at  2 X 2 1/2 and two at 1 7/8 X 2 5/8
  • the inside panel is 4 X 5 1/4
My mother-in-law is coming today and we are having a Birthday party of Don tomorrow with about 25 people coming! Seeing as this is the long weekend, with a party and family coming and the boys starting school on Monday (my middle  boy is staring Kindergarten! Yikes!)I am not going to be posting for a few days. Have a wonderful last summer weekend and I have some SUPER cards for you next month!

DeeLitefully Yours,
Diana

Thursday, August 28, 2014

Holiday Catalogue!

Todays the day!! You can now order from the holiday catalogue and I couldn't be more excited! I can't wait to show you some of the projects I have made already! Enjoy and please let me know if you would like a catalogue mailed out to you! You can also go to the Stampin Up tab at the top of this page to take you to my Stampin Up site where you can browse the catalogue on-line and place an order anytime!!

Be sure to check back on my class tab as well as new classes are going to be starting soon!!

DeeLitefully Yours,
Diana

Wednesday, August 27, 2014

Hubby Birthday!

Today is my hubby, Don's birthday! He is turning the big 3-5! Not only does he work hard to support the five of us, keep all the vehicles running and in working order, fix anything that breaks in the house, he is also my best friend and biggest supporter of my hobbies. I love this man with all my heart so I had to make a special card for him!
This card is my own design - I am so proud of it and LOVE how it looks!! As you know, Don is a man of many trades so I designed this card with his work clothes in mind - cargo pants, lol. I made two of them because I want to keep one on file to show for sales purposes (if you would like some cards made just email me and I will give you a quote!)
 It really came together quickly and it is such a masculine card! One of my cards that I am most proud of I have got to say!
 I bought the Scallop Tag Punch in my last order and wanted to use it for something. I can be honest and say I haven't tackled tags yet, but this was a good start. I sponged the edge of the paper to give it "worked" look and a few dots just helped to fill in the empty space.
 I only had the one piece big enough of the brown DSP which is from the Parklane pack. So I stamped on the DSP from Flashback with my Gorgeous Grunge stamp set - it made me think of paint splatter - and other "worked" look
I hope you enjoyed all the pics today and I know that my Sweetie will love this card - it will be a shocker as I usually show him ALL the cards I make but he won't see this one until today!

Happy Birthday Don! I love you and I know you will all love this card

DeeLitefully Yours,
Diana

Tuesday, August 26, 2014

New Classes Added

New classes have been added be sure to check out the classes I will be offering this fall! I am excited to help you create beautiful cards!

DeeLitefully Yours,
Diana

Monday, August 25, 2014

Cutie Birthday

Quick post today guys. This is an other card from Lillian Kemp - man does she ever do such clean crisp cards doesn't she? The tone on tone is just beautiful and makes the sentiment pop that little bit more. I love how she rounded two of the corners to change it up a bit - why have I never thought of this?
The Blendabilities were pulled out again here too. Looks great.

I should be getting my first set this week too - so once I have played around with them I will post some tips and tricks!

DeeLitefully Yours,
Diana

Saturday, August 23, 2014

Happy Birthday to Me

I have decided not to post a card today because I am hoping you all will share some of your creations with me because ...

Today is my birthday!

Although I am not liking getting older I am handling it better this year than I have the last few years (still not gonna tell you how old I am!) Today we are heading to Calgary for the day. We are going to stay with my beautiful cousin Maddy and her family and take the kids to zoo. Then have a glass of wine (or in my case tea) and visit for the night. It is going to be a great day and a wonderful way to start to wind down the summer.

This coming week is a going to be busy, hubby has his birthday in four days, my mother in law is coming to visit and I am hosting a party for my wonderful husband next weekend, and then it will be getting the kids back to school. Hard to believe that summer is almost over!

I have made a decision about my blog here too. I am going to be cutting back a little on the posts. I am finding it hard to keep up with great cards for you guys and still have time for my boys and the other crafts that I like to do. So I will be posting a little less. Card making should be fun right? And I have been getting stressed about it and I don't want it to become "work" I am sure you will all understand but I will have some great cards for you over the coming week and you will be able to order from the Holiday Catalogue this week too! Woo hoo!!

Have a great day all and I will be sure to eat a lots of cake!!

DeeLitefully Yours,
Diana

Friday, August 22, 2014

Fun Fold Friday - Lets use some DSP

I am back with an other Fun Fold Friday!I have been having trouble using my DSP as I just don't know what to do with it, so I have made it my goal over the next few months to use up a bunch of my DSP and with cards like this that won't be hard! I have lots of pictures today so lets get to it!
  • DSP cut at 5 1/2 X 12
  • score at 2, 4, 8 and 10
  • fold in at the 4 and 8" marks and then fold back out at the 2 and 10" marks
  • open up the card and measure down 2 3/4" from the top of the card along the outside edges
  • cut from the top of the 4 and 8" marks to where you marked on the outside edge, save your scraps
  • add your outer oval tab and sentiment (I used my new High Five stamp set for this one) and I embellished with candy dots (love those things!)


  • glue your scraps to the inside of the card, see above, this gives the card more stability when it is standing up and adds some fun to the inside *because it is already scored it will fold easily too


  • cut your inside background  3 1/2 X 5 and your Whisper White 3 1/4 X 4 3/4
  • stamp your images and you are done!
Isn't it cute? And really not that hard at all! Have fun with it and enjoy your weekend!
 
Dee-Litefully Yours,
Diana
 

Thursday, August 21, 2014

Star Buddy

This card was given to me by an other stamper, Lillian Kemp and how cute is it! I love the white with Bermuda Bay and Crushed Curry - it is so clean and simple.
You will notice that she used the new Blendabilities on the dino character and just look at all that depth! He looks like he could just jump right of the page!

Thanks Lillian for an other great card!

DeeLitefully Yours,
Diana

Wednesday, August 20, 2014

Flower "Peacock" Stamp Art

I saw a picture of a peacock stamp art using the Flower Patch stamp set and I just had to try it!! I LOVED how it looked. I wasn't to sure how it was going to turn out but I have to say I really really really love this card! It is so pretty and elegant. This card is different size than I have ever used before, it is 4 1/2 X 4 1/2 because I wanted to have a square centre to work with.

The trick for this type of card is the Stamp-a-ma-jig! I must have for stamp art!! It lets you get the perfect placement and keeps everything lined up. The other tip that is very important - stamp off! You don't want the background to be to dark or else you won't see the detail - in this case the "feathers" in the wings. You will also notice that there are "specks" on the back wings - and that actually started out as a boo-boo but I made it work for me. I had my stamp-a-ma-jig plastic turned the wrong way when I first placed it down so some of the ink "rubbed off" so I made it work and put a bit on each wing - I think it just adds some more dimension to the feathers.

I will admit this card took longer than my usually fast cards, but every once in a while you just have to make something different and spend a little more time getting a beautiful card that you are proud of!

DeeLitefully Yours,
Diana

Tuesday, August 19, 2014

Sweet Treat Box


You all know that my sweet little sis is getting married and I have been busy getting organized for that. I made this box and she loved it so I am going to make a bunch (I believe 150 of them to be exact) for the candy bar they are having at the reception - how good is that going to be!
An other cute box which is going to be great for the little treats that it will hold!
  • base cut 7 X 7 square
  • score at 2 1/16 on all sides
  • Lid, DSP 6X6
  • score at 1 1/2 on all sides
  • add your embellishments on the top (I used the Flower Patch stamp set at framelits, love it!)
  • Ta Da a cute little box!
I am going to modify it to make smaller ones for the boys to take to school for Halloween treats - should be fun and for sure I will share that with you all too!

DeeLitefully Yours,
Diana

Monday, August 18, 2014

Card Holder

I have been spending a lot of time making cards lately and have decided to try my hand at making 3D projects. They are just as fun as cards and I love how they can be practical too!! This card box is a perfect example of that, I got the instructions from Pootles.com a great demonstrator from England. It fits 6-8 cards with envelopes depending on the embellishments used on your cards. I am going to make some more so I have somewhere to store my cards!  
Here are the dimensions you will need and have fun with it!
  • card stock 8 1/4 X 11
  • score along the long edge at 5 1/4 and 7
  • score along the short edge at 1 3/4 and 6 1/2
  • fold it all up and add your DSP 3 1/2 X 12 scored at 1 7/8, 3 5/8, 8 3/8, and 10 1/4
* the DSP will not fit all away around the box but you won't see the back so that is okay!
Embellish as you like!

DeeLitefully Yours,
Diana

Sunday, August 17, 2014

Artful Flower

Single layer cards are not ones that I make very often (and quite honestly in the crafting world you don't see them very often) but todays card gets two huge thumbs up from me! I LOVE it!!!
I have got to say that Work of Art is my favourite stamp set and I really encourage all of you to get it - it is so versatile! Todays card was made using only two stamps from that set. I colours I used for the flower were; Delightful Daffodil, So Saffron and Crumb Cake. I made sure to stamp off first to create a softer feel for the flower.
I then rotated the same stamp and used Wild Wasabi so make the leaves and circle of Cajun Craze for the centre. I love the depths that the colours made and how the flower seems to be popping off the page. It was so fast to make and I can't wait to whip up a few more in different colours. Have fun with shades and colours! Wouldn't this look great in reds? Hmmm, I am thinking Christmas card here ....

DeeLitefully Yours,
Diana

Saturday, August 16, 2014

Blooming Birthday

LOVE LOVE LOVE this card!! Yellow is my favourite colour as it just makes me feel happy and brings a smile to my face! Todays card whipped up in now time and would just put a smile on anyone's face.
  • cut two pieces of DSP (I used from Lullaby) 4 X 1 1/2 and one solid strip (Hello Honey) 4 X 1 3/4
  • Blackberry Bliss 4 1/4 X 2 1/4
  • Very Vanilla 4 X 2

  • I used my new stamp set Flower Patch (pg 156 AC) with crumb Cake and Delightful Daffodil. I know the paper I used had Hello Honey but when I stamped with it I just found that the stamped colour was a bit to dark for this card so I chose a brighter yellow instead.
  • Blackberry Bliss was used for the sentiment and used my Scallop oval punch and a few dimensionals to pop it up
  • it is a bit hard to tell in the pictures but I also added rhinstones to the two centre flowers, a little extra happy for this card
Dee-Litefully Yours,
Diana

Friday, August 15, 2014

Fun Fold Friday with a Twist

Fun Fold Friday again but this time with a twist, this isn't really a new fold but it is new idea for making a involved card! Todays card was CASEd from demonstrator Lillian Kemp. It is such a cool card and I am super excited to share it with you all today! This card takes a bit more time and finiky work - just to get the circle punches placed properly. A ruler was my friend for this card!
  • My card base is Pool Party (love the soft feel of this colour!) Whisper white background cut at 5 3/8 X 4 1/8, then Flashback DSP (again I know!) 5 1/4 X 4, stick all these layers onto the front of the card
  • You will now want to use your ruler to figure out how far down you want the circles to be - this is all personal choice then punch out using your 1 3/8" circle
  • Also punch out three additional 1 3/8' circles of Pool Party
  • on Whisper White I stamped my Dinoroar stamp set (again retired sorry but my little Evan loves Dinos and I know a lot of other kids that do too!) but Little Buddy Birthday is works great too (page 89 Annual catalogue)
  • once you have them stamped punch them out with your 1 1/4" circle punch and stick them on the 1 3/8" Pool Party pieces
  • to place the dinos in the correct spot on the inside of the card I closed the card and placed a pencil mark where my circles were then I stuck the stamped image on that mark
  • make a flag with your sentiment on it and add a few candy dots and you are done!
This card did take a bit more time than usually (and by a bit more time I mean about 5-10 more minutes) but it was completely worth it!

Dee-Litefully Yours,
Diana
Diana

Thursday, August 14, 2014

Polka Dot Birthday


Todays card I could make a million times over! Just love how it looks and how quick it all came together (well sort of!) Now the sort of comes in because it took me a bit to figure out the size to cut the DSP and I will admit I made quite a few mistakes before I got it all figured out but luckily for you that means you won't because I have done it all for you already!!
  • Cut four pieces of DSP (two of each) at 2 1/2 X 2
  • Crumb Cake sentiment base is 3 X 2 1/2
  • Whisper White is 2 3/4 X 2 1/4
  • I used the stamp set Delightful Dozen which is now retired but the Remembering Your Birthday set is very close (page 59 of Annual Catalogue)
  • I then made a little ribbon tag using the crumb Cake Seam Binding Ribbon - what a soft flowing ribbon to use!
There you have it. Quick and easy and done. I am going to do up a batch of these in Christmas colours I will be sure to show you those as well

Dee-Litefully Yours,
Diana

Wednesday, August 13, 2014

Happy Birthday Cutie

With todays card I just started playing with paper and this card took shape, I loved it so much that I had to make it in two versions so I thought why not a "boy" card and a "girl" card. I love, love, love how they turned out so lets get to it!
  • Background colour cut at 5 3/8 X 4 1/8 and I scalloped the bottom edge
  • Lullaby DSP was cut 5 X 4, I stamped a few balloons on the DSP with the same colour as my background
  • I used an other piece of Lullaby DSP 4 1/4 X 2
  • A 2 1/2" circle was punched out in then the image was stamped using the Little Buddy Birthday and then punched out with the 1 3/4" circle punch
  • Ta da you are done! A great card for a little friend!
Dee-Litefully Yours,
Diana

Tuesday, August 12, 2014

Make a "new technique"

When I started off with this card I wasn't sure how I was going to like it. But I tried something new and I LOVE it!!!An other masculine card - woo hoo!! I love how the focus of the card is not right smack in the middle have it towards the top of the card just makes it a little bit different and give the whole card a different feel. The DSP is from Flashback - man am I loving this DSP pack!
The new technique that I used was sponging - and I will be honest you are going to see a lot more of it because it is easy and just gives a big punch to the card!
  • take your sponge and dab it into the colour of your choice - here I used Smoky Slate
  • holding the piece of paper in one hand brush the sponge down along the edge of the paper, it gives it this weathered look and adds dimension to the piece
  • remember to use a different sponge for each colour so you don't get your ink pads mixed, or if you don't have enough sponges just use one sponge for each color family.
I put dimensionals on the sentiment and added a couple of pearls at the bottom, but the card just didn't feel done. So I punched out a star from Island Indigo and that was the final touch this card needed.

I hope you try out this technique because it is super fun and easy and just adds more to your simple cards.

Dee-Lited you joined me today
Diana

Monday, August 11, 2014

A Wedding Thank You

Today is a BIG day! I will be getting my Holiday catalogue pre-order today! The Holiday Catalogue is AMAZING and I can't wait to start creating and sharing some of the great new products coming out! But lets get on with the card!

My little sister - Catherine - is getting married and I will be making the Save the Dates, wedding invites and thank you cards - don't worry I will be posting about this adventure while it is under way. Cath and I are still hashing out details with the invites but she has chosen this style for her thank you cards, so I have started to make them up for her. Don't they look so elegant? The colours she has chosen are similar to Elegant Eggplant and Bermuda Bay so half of everything will be in those two colours. This card was actually quite quick to put together. I ran the Elegant Eggplant through the Big Shot with the swirls envelop (which isn't stampin up I am afraid but we all have items in our craft rooms from different places right?) cut them into the flags then added the white and black strip a quick stamp and it was done.

Quick tip: I used my hexagon punch to make the flags! This way I would insure that they were all even and looked the same - I will be sure to post pictures of how you do that in the next few days - once I have the hubby home to hold the camera while I am doing it lol!

Dee-Litefully Yours,
Diana

If you would like me to mail you out a catalogue send me an email and I will be sure to get it out to you! Ordering starts on Aug 28 so don't wait!!

Sunday, August 10, 2014

Splatter Thanks

This card design might look a bit familiar to you, and yes have seen it before. My Upliner Sherry gave me card like this one and I have changed it up to you use what I have. The reason I have reposted this design again was because I wanted to try out the technique of stamping right on the DSP to give it a bit more flare! Fun is what it was!

As I have said in the past I have trouble working with the DSP because 1) I find it hard to cut up the pretty paper and 2) some of them are so busy I don't know what to do with them. This paper today is from the Flashback DSP and I really loved the settle look of the paper. I took out my Gorgeous Grunge stamp set and stamped some splatters with Lost Lagoon (love this colour!) and Tangelo Twist a colour that I have never worked with before - out of my comfort zone but I think it turned out okay!A couple flags a piece of ribbon and this card was done - change up the sentiment and this would work very well for a masculine birthday card don't you think?

Dee-Litefully Yours,
Diana

Saturday, August 9, 2014

I DID IT

Craft show today! And I am happy to report - I did it!!

2 weeks
25 designs
200 cards!!
(I was also able to make 35 Christmas cards too!)
I am so exhausted! That is a lot of cards to make in a short period of time. I used a bunch of designs that I have already posted for you guys and over the next few days I will be posting some new ones that I came up with!

Wish me luck today!

Dee-Litefully Yours,
Diana

Friday, August 8, 2014

Fun Fold Friday - and I'm BACK!

Sorry to all of you who came and looked earlier and there was no write up - I had a lovely week off but then when we got back from holidays our beloved dog, Ripley passed away. He was with us for 9 years so I am really feeling the loss and just having a hard time getting things done this week. So I apologize again.
On with the card. This card was actually pretty easy to make. The center square is 4" big and you fold all the corners in to the centre then fold them back out again. You could put any shape in the centre you wished - the card I CASEd for this one had a butterfly which I really liked but I don't have that punch so I had to improvise.

I do have a hard time using the Color Collection DSP because I find them very busy. I thought this card used it very well and helped to "control" the business. A Dozen Thoughts stamp set is quickly becoming a go-to for me - love the small printed phrases!

So again sorry for the delay and I will do my best to stay on the ball now. Rip was an active dog right to the end so that is what I am going to be too.

Dee-Lited to be back
Diana

Friday, August 1, 2014

A bit of a break

Whew, summer holiday is half over and it has been a whirlwind wouldn't you say? We are heading out for the long weekend at the lake. Looking forward to doing some boating, fishing and a family golf tournament - this will be very interesting, the boys have never golfed and I haven't touched golf clubs in ... lets just say quite a few years! It is going to be a great time.

I will be taking a quick break from "blogging" over the next week here - some much needed rest for me. I will LOTS of great stuff to show you when I get back. I am going to get right back into Fun Fold Fridays as well as Mini Mondays and I get to place my pre-order for the holiday catalogue today - which is amazing!! I can't wait to rest up and create!

I promise my friends, I will be back at on Aug 8, don't forget about me!

Dee-Litefully Yours,
Diana