Saturday, May 31, 2014

Butterfly Card

 This card is for a very special friend. Her and her husband waited 10 years to have a baby and they recently adopted a beautiful baby girl. So to go along with the quilt I made for them I needed to make a cute little baby girl card. Now I have a confession to make, I don't own ANY baby stamps? How did this happen? I am going to have to remedy this as I know quite a few people who have little babies on the way!

Anyway back to the card, I thought up this beauty while I was folding laundry (something I do a lot of here) Pinks and purples are perfect for a little girl and the butterflies are very pretty. I used two-tones on each of the wings, some with two colours, others with 2-step stamping
  • put the ink on your stamp and then do one stamp on a scrap of paper, then
  • place your stamp where you want it,
  • put fresh ink on the second part of the stamp and stamp right away over top of the first. Same colour two different tones!
  • the Stampa-ma-jig makes lining up the placement super easy!

To add some more fun to this card I used dimensionals to make the butterflies "fly" off the page. For added depth I stacked two dimensionals on top of each other to life one up higher off the page.

This card took me a bit longer than usually to make, only because I had to fussy cut the butterflies out after I stamped them. If you were to use a stamp and punch set this card would whip up in a jiffy!

I beautiful card for a beautiful family!

Dee-Lited that you joined me today
Diana

Friday, May 30, 2014

Fun Fold Friday

This blogging experience is getting to be a lot of fun! Some were worried (Martha) that I might be trying to do too much by posting every day but really it hasn't been all that bad (spoiler alert: I actually type up a bunch of posts at the same time and then just pick which date I want it to post)

I have decided to start something new!! At least once a month I am going to post Fun Fold Fridays!Can you guess what those posts are going to showcase? Fun Folds! It really is fun to try out different folds and see how you can change up a card just by changing the shape!

 
 I CASEd (Copy And Share Everything) from an other demonstrator, Lillian Kemp. I LOVED the fold!


As you can see this card uses a fair bit of DSP but it makes it so fun and alive! Of course you don't have to cover up all the card base for a kids birthday card, I figured the more colors the better! The stamp set is Cool Kid from the Celebrate the Everyday Catalogue which is pretty well done (tear) but don't worry the new seasonal catalogue is right around the corner, well August.


The best thing about this card? It still fits into a standard envelop! YEAH! 
  • Cut the paper at 8 1/5 by 5 1/2 (you can get two for one!)
  • along the long edge score at 2", 3 1/8", 5 3/8" and 6 1/2"
  • fold the two edges of the two smaller triangle towards the inside of the card
  • add your DSP, then using a hole punch, punch two holes where you would like to add your ribbon, run the ribbon through, tie a bow and ta da!
Well there we go. Our first Fun Fold Friday. I think it was a success don't you?
 
Dee-Litefully Yours,
Diana

Thursday, May 29, 2014

Success!

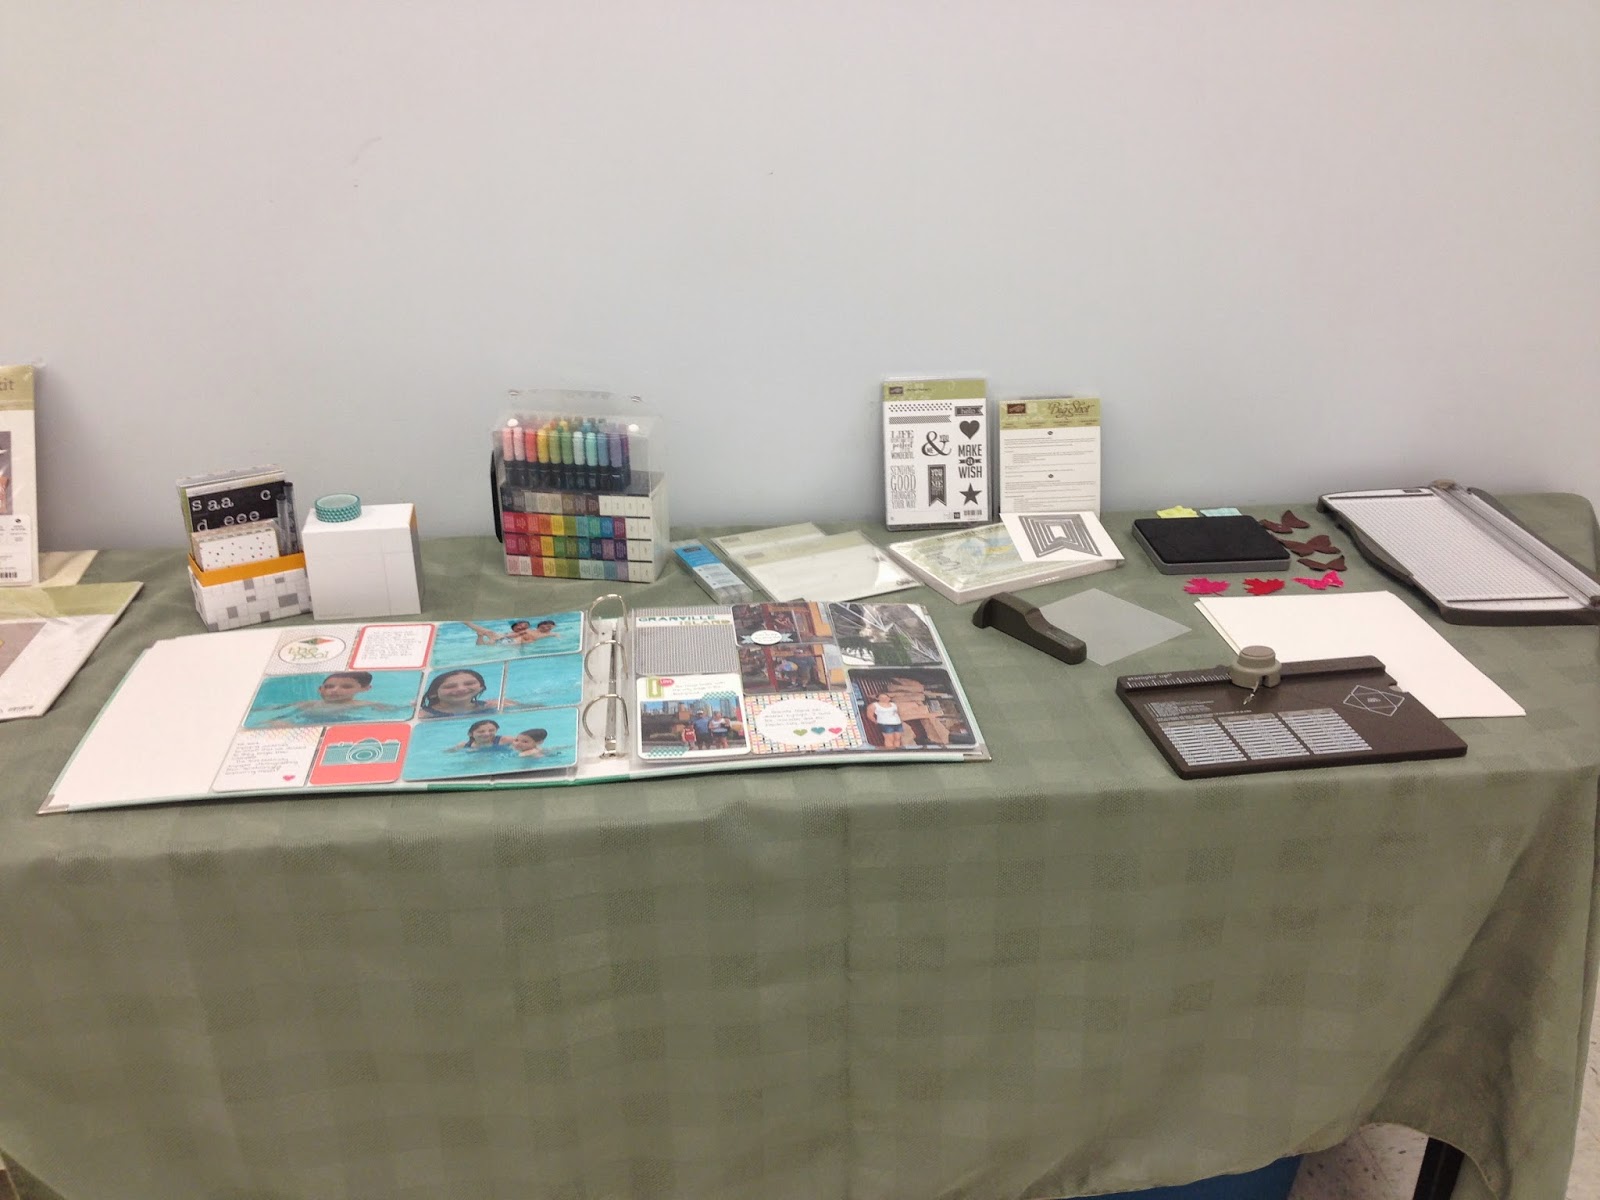
 What a great time last night! I had so much fun and I think all the wonderful ladies who came! Here are some pictures of the room and how I had it all set up. I had a number of displays surrounding the craft area and I used tablecloths to "brighten" up the space (I thought it added a nice touch!)


This was my catalogue and color table. I am a very visual person so I had paper from all the different color families Stampin Up offers. It made it easy for the ladies to really get a sense of the color groups and to actually see what the colours looked like.

The tables were set up with two cards at each table and all the supplies needed to make those cards. The tables were nice and big so there was a lot of room for us all to work.

 There were some beautiful cards made and such great imagination!  It was so interesting to see how they took off with the idea and made the card completely their own! I will display some pics of their cards over the next few days! Love them all!

My Welcome Workshop was a great success and I hope they all had as much fun as I did. I will be placing an order on June 4 - so if you want first dibs on the new products let me know and I will put you in the order!

Dee-Litefully yours,
Diana

Quick Trick

Some of the stamp set we all have can be kinda tricky to get back into the boxes. Come on we have all been there! My new favourite, Work of Art, is like a puzzle trying to get back in its case. I spent almost 10 minutes trying to fit them all back in again, longer than it took me to make the card! As Don was watching me struggle (yes he watched and didn't offer to help ;-) and I finally got it he said "you should take a picture now of it all in there, print it and tape it onto the inside of the box" Brilliant!! I forgave him for laughing at me! So that is my tip for you today, take a pic of the stamps in the box and keep it in the case!

For all of you who signed up for my May Stampers Club - here it is all done for you! Lol!

Wednesday, May 28, 2014

Welcome Workshop Tonight!!

Well it is finally here! My Welcome Workshop is tonight and it looks like I am going to have a full house! Getting all my Stampin stuff organized and ready to head out the door when Hubby gets home from work.

As you can see I have been busy! A BIG THANK YOU to Donna MCrae for lending me some items and for helping me get ready! It is going to be a great 2 hours, with lots of crafting and laughs.  Wish me luck and I will post some pics tomorrow!

Dee-finetly excited!
Diana

Tuesday, May 27, 2014

Dots a Lot

So simple! So quick! This card came together in five minutes and it so nice (if I do say so myself!) Notice the colors? They are new In-Colors again and you are going to be seeing a lot of them because they are my new favourites! For this card, I used my 3/4" circle punch, 1" squares in each color, Word of Art stamp set (again!) and voila! Clean, crisp, simple and neat - my favourite!

Dee-litefully Yours,
Diana

Sunday, May 25, 2014

Hexagon Happy

Have you ever started on a card and not been sure if you are going to like it? That is how this one started off. I wanted to use my Six Sided Sampler stamp set and punch and didn't know how it was going to turn out. So, I just started stamping with my Regals, punching out, and added a few dimensionals, A Thousand Thanks stamp and I LOVED it!! I know I have said this before but this is my favourite card that I have made to date! I am actually going to have a hard time giving it away, so the easy solutions? I going to make a whole batch more!

This was a good lesson for me, one that I am happy to pass along. If you start on something that you don't love, keep at it and you might be pleasantly surprised at the end!

Have a Dee-liteful day!

Diana

Saturday, May 24, 2014

Not just the card

Any other quick post for today. I made a set of four of these each in a different colour. The scallop edge just added a little extra to this simple, I've gotta say, elegant card. The Regarding Dahlias is my favourite stamp set and I am starting to use it A LOT! The little extra that I did with these cards was to add the background DSP to the flap of the envelope making it a matched set? I think this will make the mailroom smile and compliments the card nicely.

Sorry for the quick post today! Its been busy and I am getting myself all ready for my Welcome Workshop and once the workshop is over I will be posting my class lists for you to peruse. I hope you will consider joining some of the classes and/or clubs!

Dee-litefully Yours,
Diana

Friday, May 23, 2014

Mini Box of cards


I was playing around in my craft room this weekend (thank you Sweetie! He took the kids and left me to be for 3 glorious hours!) I made this cute little 3X3 card box and five cards with the new In Colors! Aren't they great!?! I will admit that I didn't love them when I first saw them but now I love how rich the colors are!
 
These five cards were so easy to make and they were the very first 3X3 cards I have done. I wanted to keep them simple and really showcase the colors so I kept everything clean and easy. I decided to try and use my score pad to make some indentations on the card base. It really just added to the overall design and sharp lines of the cards.
 
The box was made with a piece of paper Sahara Sand 5 1/4 by 10" and embellished with some of the new DSP. The stamp is from my new favourite (and go-to) stamp set Work of Art.

The five cards fit perfectly into the box and it would make a great gift for someone (a teacher or friend perhaps?) I am going to be giving these as a Door Prize for my workshop (less than a week to go!)
 
I hope you are as Dee-lited with this little post as I am!
 
Diana

Thursday, May 22, 2014

My Paper Pumpkin try for 50% ONLY until May 23

Just got an email from Stampin Up and this deal is amazing!! You have heard me mention My Paper Pumpkin (MPP) before and how much I love it! This deal is great for anyone who wants to give it a try and it is such an incredible cost!

If you sign up by May 23 you will receive June's MPP for 50% off!!!! Which means you can try it out for $12.50 - that includes shipping!!!! Remember the kits come with everything you need to make a few great little projects, instructions, paper, stamps, ink and embellishments! Try it once and if you don't want to get any more kits after this one just unsubscribe by June 15, no questions asked!

What: 50% off June's kit
When: Subscribe by Friday, May 23
Where: MyPaperPumpkin.com/signup  or call 1-800-STAMPUP
How: Enter the promo code SHELLIDEAL

Click over to my Stampin Up site (http://deelitefulstampin.stampinup.com) , click on MyPaperPumpkin and it will walk you through signing up, just don't forger to use the promo code SHELLIDEAL

I really hope you give it a shot - June's kit is a great Father's Day package! And trust me this price will not be beat! Give it a shot and I know you will be hooked!! Offer ends May 23 so don't wait!!

Dee-litefully Yours,
Diana

Neutral Card Guts

This card was made from the "card guts" that my team leader gave us at the meeting. Basically what happens is - as a challenge she gives us all a pack of "card guts", left over pieces of paper that we have to use to make a card or a 3D project. We then bring our creation into the next meeting and are entered into a draw to win all the card gut projects for that night. I think it is a great idea and really gets the creative juices flowing. I can't wait to see what everyone else does with theirs!

I was given, the three neutral pieces of paper (Crumb Cake, Very Vanilla and Early Espresso) and to figure out what I was going to do with them. So I decided to do a spin off of the tree card I showed you earlier this week. I LOVE my circle punches and the colours just spoke to me of a night scene so with my trusty punch I made the half moon and added a "shadow" to it. Then I used my pretty rhinestones to make it look like stars (that's what it looks like to me anyway). It still felt like it needed more so I added a little bit of Early Espresso twine to the top corner. Some dimensionals all over the back and I was done! This is different from other cards I have made as I haven't really tried "shadowing" objects before, what do you think?

An other day is about to begin and being as it is Thursday it is going to be a busy one! I hope you all have a Dee-liteful day - and try to get creative!

Diana

Wednesday, May 21, 2014

Subtle Hi


This is one of the cards we will be making at my Welcome Workshop. I want to try and showcase all the different colour families Stampin Up has to offer and this is my card for the Subtles. In this card I use the Background DSP (Designer Series Paper) for the Subtles group as well. Each colour group; In-Color, Subtle, Brights, Regals and Neutrals, there is solid color paper and theBackground DSP. In each pack of DSP there are four designs in each of the colours for that family. You get a lot of paper at a great value! ($26.95)

This card was made in about five minutes and is just pleasing to the eye. My big sister (whom I send a pic of almost all my cards to first, before I post them) said she liked this one best!

One more week until my Welcome Workshop so please let me know if you are going to be there!

Dee-litefully yours,
Diana

Tuesday, May 20, 2014

Simply Green

 
I have been working on getting cards together for my Welcome Workshop (which is on May 28 if you want to get details check out the Classes tab) and this is one of the projects I have whipped up for us to do. It was super easy and quick but uses a couple of neat techniques.

First off I started with a piece of Pistachio Pudding Paper (In Color 2013-2015) and ran it through the Texture Boutique to get the stripes embossed onto the card (sorry it didn't show up very well, I will try and get a better camera - Don if you are reading, hint, hint :-). Then I used my 2.5" circle punch. I placed the paper on my card and lightly marked with a pencil where the edges of the circle were, so when I placed the stamp (Lovely As A Tree, with Baked Brown Sugar ink) I knew where to place it.
I then cut a piece of Wild Wasabi Grosgrain Ribbon (sadly this is retiring but the new ribbon in the catalogue will help us all to get over the loss) and tied it around the card. I then used dimensionals all over the back to make it lift up off the card front, creating depth and interest. And that was it! As you can see it was a very easy card to make and you could easily add any sentiment you wanted to the inside. The best part - this could be a masculine card - which are SO HARD to find.

It's been a long day so I going to put my feet up and Dee-light in the quiet of the house.

Until tomorrow
Diana

Monday, May 19, 2014

Classes are coming!

Just a quick post for today; its holiday Monday and there are things to do. I just wanted to let you all know that I am going to be posting my classes over the next week. I do not have any dates set yet but it will give you all an idea of what I am going offer.

You will see that there are going to be quite a few options and that many of them there will be a To-Go option - meaning I will have it cut and ready for you to assemble all you have to do is the stamping. And I am happy to say I will mail anywhere across Canada! As class times show up be sure to register so that can be sure to get in on all the actions!

Stay tuned for these exciting class lists!!

Dee-litefully yours,
Diana

Sunday, May 18, 2014

Sample Wedding Invites


Here is the same technique as yesterday but with two different colours. My little sis is getting married and I am going to be making their wedding invitations (aren't I a good big sister?) This is the style of invite that I am working on for them and the green and purple are their wedding colours. These are the proto types for them to look at and agonize over (as we all do for our weddings) The green powder has sparkles in it and I find that the definition in the flower isn't as pronounced.  The black on black adds a very sophisticated look to the card.  The purple on the other hand once again lets the flower really pop! I am still working on finding the perfect ribbon to go with these colours - so if you see something let me know!
 
I am going to have to do tone-on-tone stamping again because I like the subtle look it creates and how it doesn't distract from the rest of the card.
 
Gotta go and get the boys ready for bed. So until tomorrow.
 
Dee-vinely happy with these results
 
Diana

Saturday, May 17, 2014

White on Black


 I have been playing around with different techniques and saw this one so decided to CASE it. (Copy And Share Everything - a new term, I heard it at my Team Meeting and I have always called it scraplifting but CASE works too).

For this piece I wanted to try stamping on black paper (something I have never done before!) I used the Regarding Dahlia stamp set (which is not retiring - thank goodness! I love this stamp set!) stamped with Versa Mark ink. I then stamped it on the black paper and covered it with snow embossing power (not stampin up but it is what I had around) I then took my heat tool and ta da! Got this beautiful result!! I love the detail in the flower and how it really pops off the page! Tomorrow I will show you colour on black.

Until then I am Dee-liteful yours,
Diana

Supplies:
Regarding Dahlias (w) 131347 (c) 130327


Friday, May 16, 2014

Soft and Sweet

I have saved my favourite for last! I think this is a gorgeous card and design! And so simple! Done in 5 minutes! I think these would make beautiful invitations to a wedding shower, or baby shower. These colours again are from the Subtles collection and I am starting to get the feel that this is my go-to colour group. I love the soft hues and softness of the cards the create. Notice the scalloped edge on the bottom which adds a bit of dimension but doesn't distract you.

I want to thank my Upliner, Sherry for the WONDERFUL card ideas! I am so excited for next months meeting when I am sure I will learn even more!

Dee-lightfully yours,
Diana

Thursday, May 15, 2014

Splash of Colour


I just love this card to bits! It has been a very long time since I have done a single layer card! I am so used to adding embellishments and layer paper that it is easy to forget that you can create beautiful single layer cards. The colours used in this card are from the Subtles collections and again uses the Work of Art stamp set.
 
The double splash of blue at the bottom, is actually the same colour - Marina Mist. To create the look of two colours you stamp once, then stamp again - giving the illusion that you used two different colours! Cool, eh?
 
I am going to be trying this card design using the different colour groups that Stampin Up offers and i will be sure to show it to you all when they are done!
 
Until tomorrow have a Dee-vinely creative day
 
Diana

Wednesday, May 14, 2014

A different pair up

This is one of my favourite from my Team Meeting! I never would have thought to pair up these to colours, Melon Mambo and Smoky Slate, but WOW does it every work. Again this card came together in about 10 minutes and looks so lovely. I love the stamp set (which is from the new catalogue) called Work of Art - mine should be showing up any day now! I used a dimensional to make the heart my the sentiment stand out and added the jewel just to give it a bit of bling. I want to make a whole stack of these and just send them out to show them off!

Three more cards to show you and from the meeting and each one is better than the last! I can't wait to do demo this class! Date will be coming shortly!!!

Dee-finetly excited!

Diana

Tuesday, May 13, 2014

Brights

Here is the first of the cards we made to go in the card box. This card uses the colours Rich Razzleberry and Island Indigo from the Brights colour group. Don't they make a sharp pairing? This card came together in under 10 minutes and uses embossing for the sentiment. The embossing makes the lettering shiny and pop out a bit more. I like the clean lines and bright colours!

I got my Starter Kit yesterday and I am itching to go and play with it so hopefully the boys will go to bed nicely tonight so I can get in my craft room and create!

Have a Dee-vine day!

Diana

Monday, May 12, 2014

Got My Starter Kit

I got my Starter Kit today for Stampin Up!! I am so excited!! There are so many things that I want to play with now! And the new catalogue is AMAZING!!! The layout is fantastic and the ideas are wonderful! I can't wait to share it all with you! Just wanted to share my excitement and keep you posted that classes are going to be posted soon! I hope you will all consider attending one - or getting a To-Go Kit!

Dee-vinely Happy,

Diana

Card Box

So I went to my first team meeting for Stampin Up! on Wednesday and my head is still reeling! Wow, did I ever get some ideas! There are so many new and wonderful things in the catalogue and I want them all!


My Upliner (Sherry) had a wonderful "Make and Take" for use to do. I have pictured here the box that we made and over the next few days I will show you all the cards 4 cards we made as well! I have to admit I thought it was pretty cool that we made a box from paper. For this we used a piece of 9X9 paper and the Stampin Up Envelope Punch Board. So easy and so fun!


I am going to be making a few more of these for sure! Wouldn't it be a great gift for a teacher? Fill it with cards maybe? I will actually be doing a class where we will make this box as well as 4 cards to go in it! (just have to wait for the hubby to get back so I can pick a date he will be home so the kiddos will be looked after) Once I have the date picked and cost figured out I will let you all know! I will also have this class as a To-Go option as well (I will have everything precut and ready for you to make - you just have to do your stamping!) What would be more of an interest to you? A class where we make 4-5 different cards/small projects or a Stamp-n-Stack where there are only a couple of cards but we make multiples of each card? Hmmm gonna have to think about that one? What are your thoughts?

I am getting really excited about starting to teach and show you all what these amazing products can do! I can't wait to get started!! Visit deelitefulstampin.stampinup.net to see what you can order today! New catalogue is coming out June 2 and trust me you DON'T want to miss it!!!

Dee-lightfully Yours,
Diana

Sunday, May 11, 2014

My Paper Pumpkin (May)

 
Happy Mother's Day! Since becoming a Mom I have learned that being a Mom is NOT easy! If I can be half the Mom my Mom is then I will be a great Mom. So make sure today that you show your Mom how much you love her and how much she means to you!

Today's post is from a Stampin Up program called My Paper Pumpkin. It an awesome way to get some paper crafting done at minimal cost! Every month, My Paper Pumpkin comes right to your door and includes everything you need to make a cute paper project. And when I say everything, I mean everything! Paper, accessories, stamps, ink, embellishments all of it! And better yet, every month is different! But the result is amazing! And better yet it is only $24.95 per month and Stampin Up now has the option of pre-paying for your Paper Pumpkin - what a great gift idea!

This months was this cute little frame. It also came with the supplies for a little box so you could wrap it up and send it - to say -  your Mom! I chose to keep mine and it is now hanging up in the hallway and every time I see it I smile. I had never thought of using paper crafting in a frame before but I think that I might do it again because it is so pleasing and you can customize it for your own décor.

If you are interested in trying our My Paper Pumpkin you can click over to my Stampin Up and sign up under My Paper Pumpkin. You can chose to try it for a month, or like me sign up to receive it every month. And you can opt out at any time!

Think about it and go and call your Mom and tell her you are thinking of her, I'm going too!

For all the Dee-serving Mom's out there have a great day!

Diana

Saturday, May 10, 2014

Simply Created 3

Here is the last of the Simply created cards. I had the most trouble with this card as I was trying to not go into my other embellisments but only use the ones that were provided. I decided to not use any sentiments on the front of these cards so that they could be used for any occasion. I don't normally use circles so that was a challenge for me but I think I did a pretty good job (if I do say so myself!) I decided that I also didn't want to "fight" with twine in the button or tying a bow so I tried something new! I am defiantly going to do the criss-cross again! I like the way it draws your eye to the centre of the card.

So there you have it. One kit, three card designs, 15 cards! I would say that is a pretty successful hour!

Have a Dee-lighful Day!

Diana

Friday, May 9, 2014

Simply Created 2


Here is an other Simply Created card for all of you! This is the favourite one that I made. It is so clean and simple and the Bermuda Bay colour just adds a bit of a pop of Colour. I used the dimensionals on the flag to raise it up a bit and give a bit of dimension to the card.

Sorry for the quick post today! More tomorrow.

Dee-lighfully Yours,

Diana

Thursday, May 8, 2014

Simply Created


Phew, what a week it has been. They keep saying its spring but the snow falling (almost everyday) makes me think otherwise. I wish the sun would shine and the temperature would warm up!

With that being said I have found it hard to get motivated over the last few days so  I took at my Simply Created kit. This kit includes everything you need to create 15 quick and easy cards (I was able to make 15 cards in a little under an hour!) This would be a wonderful kit for beginner or someone who just wants to try out card making and see what they think of it (check out my Stampin Up site to order!) Over the next few days I am going to show you what I whipped up!

This is the first two of the batch. I mixed these up a bit because I wasn't sure which "way" I wanted the flag to go. Finding a sentiment small enough to fit the flag was a bit of a challenge but not as big a challenge as trying to get the twine through the button hole! Man did that take some time! I left two of this style card blank on the flag so that I could fill it in when I needed a quick card to mail out! The Basic grey and Pear Pizzazz make for a very clean cut and cool card. I am happy with the way this turned out.

Tomorrow I will share an other card that I created and until then, lets hope Spring will come soon!

Dree -aming of Spring

Diana

Wednesday, May 7, 2014

Hexagon Card

Quick post for today! I decided to play around with my hexagon punch and wasn't really sure where I was going with this card when I started. I had a lot of green scraps and just started punching and laying them out and this is what I came out with. The simplicity of this card and the green right on the white make it look sharp. I raised the sentiment with dimensionals and it just added a touch more!

I should be receiving my starter pack from Stampin Up soon and I can hardly wait to dive in and start creating! I am already getting cards and ideas together and once the hubby gets back I am going to pick a date for my first class! I am super excited and will have many more cards to share with you soon!

I am going to my first Team Meeting tonight for Stampin Up! I am looking forward to meeting other stampers and getting new ideas to share with all of you!

Have a Dee-vinely creative day!

Diana

Tuesday, May 6, 2014

Mother's Day 2

Same card as yesterday but different colour scheme. I made the background paper about a 1/2" wider than on the previous card and changed the sentiment as well. The red and brown colouring make this card look a bit more elegant that the previous one. Red is a colour that I don't use very often, and find intimidating - maybe because my hair is red and redheads don't always get the best rap (although I do have to admit the red-head temper is no lie!) However, the bit of Brown Sugar paper (Stampin Up) helps to soften the colour and make it more sophisticated. So here are the two cards side by side.
Amazing how the same layout can look so different.

Anyway, supper is about ready to go on the table and it smells Dee-licious!

Have a crafty day!

Diana


Monday, May 5, 2014

Mother's Day

Here is a quick Mother's Day card to whip up. I love the clean fresh look of this card and how the solid color tags break up the patterned background. I made this card for a few different Mom's in my life (Martha and Mom if you are reading this pretend you haven't seen the card yet!) It really was fast and the longest part was choosing which colours to use. Tomorrow I will post the other colour scheme I chose and you will see how changing the colour really does change the entire look of the card.

I Dee-clare it and other successful scrap day

Diana


Sunday, May 4, 2014

With Lots of Love


Mothers Day is next weekend, so I am hoping to have a chance to show you all a few Mom cards. I used patterned paper as the background, which was new for me and wanted to find a way that it wouldn't be distracting to the rest of the card. I decided to off-set the red square which really give this card movement. The red ribbon helps to break up the pattern and draw the eye to the centre of the stamped image. I am sorry that they didn't show up so well in the picture! The wording says "With lots of Love" so this card could be used for any number of events, including Mothers Day

Go craft and  Dee-vour something yummy - Sunday is treat day isn't it?

Diana

Saturday, May 3, 2014

Masculine Birthday Card


This is one of my favourite birthday cards. The Basic Gray and Crushed Curry colour complement each other so well.  This could easily be a masculine card (my Dad got one for his birthday!)
I scrap-lifted this idea from an other crafter (thank you!) but modified it a little bit.  I was having trouble tying a big bow with the thick ribbon and quite-by-accident wound up get this and I have to say, I am quite happy with it! Just don't tell my hubby - his motto for me is "trial and error" :-)

I am Dee-lighted that you joined me today!

Diana

Friday, May 2, 2014

New Adventure!

Well today I took the plunge and have signed up as a Stampin Up Demonstrator! I am super excited to try this (also a bit anxious!) and hopefully it will be a success. I am going to focus on classes and clubs, something I with they had more of in my area. Just wanted to share the news with all of you!

Check out my site and please feel free to order!

Stampin Up

Dee-lightfully yours,
Diana

My First Card


This is one of the first cards that I made (not this exact one but a copy of it) and it has got to be one of my favourites! I am not normally a "purple person" but I really like how bold the purple makes this card look. The simple sentiment on a bordered label makes it pop out from the rest of the card too. Notice again I used ribbon to highlight but not be the main focus of this card. The look of the card completely changes when you use different colours too - so try it!

Dee-litefully yours,
Diana

Thursday, May 1, 2014

Scraps


I whipped this card up this afternoon and just had to share it. I used only scarps I had lying in my scrap box (something I like to do every once and a while!)  I love how this card all came together - it was fast and quick and used up little bits of scrap. I actually used my hexagon punch to make the flags (great trick and once I figure out how to post a video I will show you all!) I did you a bow (shocking I know!) and secured it in place a glue dot, I find by putting the glue dot it keeps the bow from coming undone. I also wanted to share this card to show you how you can cover up a mistake.
 
I had originally intended to have the sentiment stamped right on the card but it just didn't look good. I was annoyed because I was happy with the way everything else looked, and of course, I had stuck everything down already. So I pulled up my label punch, stamped the "hi", punched it out, punched the background shade, attached it to the back, used a couple of dimension dots and voila! Covered up my mistake and I like the look even more! This goes to show that mistakes can be a good thing! 

Having a scrap box (I use an old pencil box) right by your work space is a great way to always have a spot to throw those bits of paper that "you just might use again". Once every couple of weeks I go through and only use pieces of scraps to make cards, pages etc.  It is wonderful way to challenge yourself and to also make yourself use up the pieces that you had to save! I also find that it allows me to try out different colours together and I have to get a bit more creative when I don't let myself dip into my bigger pieces.

Try diving into your scarps and see what you can come up with! I am sure it will be Dee-vine!

Diana

May Calendar


I really enjoy making Scrapbook Calendars and have made them for family members for the last few years. This year, I decided to make one for me (something I hadn't done yet). I am going to share the calendar with all of you! At the beginning of each month I will post a picture of my calendar for that month! (too catch up on Jan-Apr pictures, I will post them throughout the month of May)

I challenged myself with this calendar by using "busy prints" something that is way out of my comfort zone. I struggled with each page and trying to work with the print instead of fighting against it! I have got to say I am very happy of the outcome!

Hope you have a Dee-vine day!

Diana